Monday 13 May 2013

Review: Makeup Forever HD foundation & my recommendations


This is one of the most popular foundations for bridal makeup. Well known for looking really good in camera, and it doesn't have any SPF or fragrance. That means, no white cast and minimal reaction with sensitive skin. Now these are facts - I've used them on myself and clients. So whatever I say later is not going to argue these points.

I love that foundation. Beautiful foundation with a little bit of satin finish. It spreads really easily, and almost doesn't look cakey if you applied it in the right way. However, I've never really do a close up photo/comparison with other products.

So.. Here I am. Lets see what this foundation does - exactly.

L: Missha Signature BB cream - Shade 2, which is one of my favorite BB creams. But it contains SPF 45 which is horrible when it comes to flash photography. 
R: Makeup Forever Foundation - N120
I took this photo around 6 hours after application btw.

Initial reaction: They both have very similar finishes initially. They both could be sheered out or build to a full coverage. I used a really light hand so it's about light - mid coverage. 
After 1 hour: Makeup forever foundation is still going pretty well, but the missha side gets a little bit oily. Just a little shine. Nothing much.
--- My boyfriend. Stared at my face for about 10 minutes and his only conclusion is one side is more oily. So.. It is not that obvious a difference actually.
After 6 hours: There is really not much difference apart from that the Missha side oxidized a little more. They both showed some shine. Well. as you could see in the photo, appearance of pores are around the same. So the way they settle are pretty similar.
* Note that I do not touch up on foundations when I do tests like this.

Conclusion:
Note that both foundations I used are some of my favorites. They are of good quality. But here's the trick... 

If you need a foundation for photography, or you're a makeup artist, spend your $75 on Makeup forever HD foundation. It sets your mind at ease on the flash back part, and it makes your makeup kit looks more high class. However, if you do not need to be photographed under flash, a lot of other foundations will do a good job. Missha Signature BB cream is fantastic when it comes to having a satin finish. But it is a little pricey ($45) as well. 

Recommendations:
So if you're looking for a cheap foundation that still gives off that little bit of glow, but with minimum SPF, I'd recommend L'Oreal Lumi foundation / Bourjois Healthy mix serum foundation (Lighter feeling on skin).

Xoxo

Sunday 5 May 2013

OOTD + Review: Diorskin Forever Flawless Perfection Wear Foundation

I have a little review here today! 

Actually I'm on a hunt for a new foundation for my brides, and I decided to try on Diorskin Forever Flawless today. 
Cost: 47usd / 75sgd

Basic information: Mid - Full coverage with an SPF of 20 (That means you probably would get a little bit of flash! x.x ). 

 
 Nice packaging and stuff but it doesn't really matter. Next, you're going to see my face... Half no makeup.


 One side of my face has the foundation + their radiant base on. Can you see which is the side that has the foundation? I took this photo only 10 minutes after applying foundation - so the fact that it is not obvious shows that this foundation may not be doing anything to my skin at all. Even my dark eye circles look as bad for both eyes.

 Second chance... Make a guess on which side has foundation. Well its the left (The side w mole).
Notice that the SA chose a sade  too light for me. Apart from giving me a shade too light, she adds a pink tone radiant base all over my face - TERRIBLE MISTAKE girls. If you have yellow tone skin, adding pink undertone base will brighten up your skin. But that would not look natural. I'd only use a pink base to highlight areas of the face. Some bases contain micro shimmer pigments - and the worst you could do is to smear it all over the face, unless you have a really really dry and dull and yellow skin, with a pinkish undertone on your neck and chest area.

Overall, I'm not impressed with this foundation. Let me just give a quick run through of my first impression:

First hour: Cakey. The fondation settled into my pores. It is very obvious there is something in my pores when I look into the mirror. Also, this foundation makes the fine lines around my undereye even more obvious. This foundation does not dry to a powder like texture. So you have to set it if you want it to feel matte.

Third hour: Foundation is still accentuating my pores and lines - less obvious though, because the natural oils on my skin kind of blended the foundation a bit I guess. (This point brings hope to the foundation, I can foresee this looking beautiful on ladies with oily skin. Do note that if you have oily skin, you probably want to set this with powder.) But areas around my nose where I have bigger pores - bad news. The foundation settled in e pores and made them... well you get it. my pores are happily showing faces.
AT this point in time, there is almost no shine on my face still - so definitely a good foundation for oily skin ladies with minimum pores.

Forth hour: Most areas on my skin looks pretty good in this foundation apart from my nose. Foundation still in the pores. Not much shine still. I took it off after 4 hours because it's kind of time to sleep.

Conclusion: This foundation does have a beautiful finish. You have to buff the foundation in well. But it wouldn't work well with anyone that has mid - large pores. It wouldn't work with ladies having dry skin either. Definitely not a foundation I'd purchase for now. I might give it another try with a different SA just to see how the right shade would feel like on my skin.

Right! OOTD now! :D

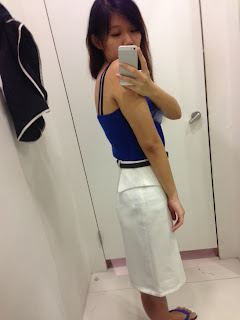
Tank top w white pencil skirt
And... Tatsing slippers! LOL isn't my fashion sense fantastic???


Just kidding.
I was just trying on that skirt. Haha. I really love that skirt. But they do not have my size in S. I thought XS might work, but its damn tight I can't even pull it pass my big ass. I then try M, but it is way too loose around my waist area. I could put both my hands into the skirt. I'd love to buy it if it is of the right size though.

This is what I wore. I wanted to go kopitiam for dinner with my boyfriend, but we ended up in some shopping mall. I didn't wear any makeup. I didn't even wear my specs! So I couldn't see anything damn.

By right I quarreled w my boyfriend yesterday - BUT HE FORGOT WHAT WE QUARREL ABOUT ALDY!!! wth I feel dumb now - why bother arguing when he can't remember anything! Is this what you get with a physics guy?

Xoxo

Saturday 4 May 2013

Just 40 simple steps to looking picture perfect every day


So I received some questions on how to look good everyday. Here are the 40 simple steps to look picture perfect!

1. Wash face - removes any dirt
2. Scrub face - reduces uneveness of skin texture
3. Toner - prep skin for next products
4. Serum - adsorbs quickly into skin
5. Moisturizer - Added moisture
6. Sunblock - reduce sun damage. Yes, picture perfect means no sunscreen, but you could always use chemical sunscreen pdts (Choose a sunscreen with NO titanium dioxide. I have a post on sunscreens somewhere.....)
7. Primer – Provides a smooth canvas for your foundation
8. Foundation – You could choose either just 1 foundation color, or 3 foundation color. But let us just stick to 1 foundation for this guide. I'll talk about 3 foundation colors in the later posts.
9. Set foundation with a powder if you are preparing to use all powder products after this. Otherwise, jump right into the other steps. For this post, I do not want to use powder products immediately. So let us blot the excess foundations off using a piece of clean tissue.
10. Apply a cream bronzer or a darker shade of foundation on places you'd like to contour. Blend
11. Apply a cream highlighter or a lighter shade of foundation on places you'd like to highlight. In this case, I'd use a lighter shade of foundation because it act as concaeler too. Blend
12. Apply a cream blush on the apples of your cheeks or on the high points of your cheeks. Blend
13. Make sure that everything looks good now. Blot with tissue again.
* Now you might be annoyed. What's with all the blotting with tissue wtf. Blotting ensures that you take off all the excess products, so even though you used so many products, people would still think you had a naked skin
14. Powder the entire face using a loose powder or any powder you want to use.
15. Leave the powder on face a a couple of minutes and dust off the excess powders & blot again
16. Now use a powder bronzer to go over your contour
17. Use a highlighting powder to go over your highlighted areas
18. Use a powder blush over your cream blush. Step 16 – 18 ensures that your colors last longer.
19. Let us move on to eyes now. Apply primer – which. If you want to start with eye makeup first, it is alright too. In occasions where you want to do eye makeup first, move step 19 - 30 to the top.
20. Apply eyeshadow – Whichever color or colors you like.
21. Blend all different shades of colors together the way you want
22. Apply pencil eyeliner
23. Apply gel / liquid liner on top to make the line smooth
24. Set liner with black/ any color of eyeshadow you like
25. Curl your lashes
26. Apply mascara primer
27. Apply mascara
28. Apply false lashes – Single / full set lashes, whichever you like
29. Curl lashes again to blend in false ones w the real ones
30. Apply mascara again to further blend the lashes
31. Apply lip balm – this step should be done earlier bt I forgot to write in so here it is
32. Apply lip liner
33. Apply lipstick
34. Apply lipgloss
35. Check. You may apply a lighter gloss in the centre of lips to show fuller lips
36. Check overall makeup – have you missed out anything? Contour and highlight the nose area!
37. Check again – Right I missed out the eyebrows. Which by right, at this stage you got to apply a dry product – powder. But I'm going to just clean up the brow area and go in with a eyebrow gel.
38. Apply a light shade of eyebrow powder on top of eyebrow gel after it is dried
39. Apply darker shade of eyebrow powder to the ends of eyebrow to give a more natural look
40. Check to see if you look perfect now – touch up little details.
ONLY 40 SIMPLE STEPS AND YOU ARE READY TO GO! YESHHHHHHHHH

no wait. Missed out on the HAIR.

DANG. Now you know why Kim Kardashian spends 2 - 3 hours on makeup before her photoshoots! I might have missed a few points here and there, but its about there.
- But actually... Taiwanese spend more time than Kim. At least that's what I heard.
- and obviously I don't spam all the steps daily on myself. lol too much!

Xoxo

Wednesday 1 May 2013

Bridal makeup on YOUTUBE

I believe that a lot of us look around youtube for makeup looks - and my brides tells me that too.

Well videos do show pretty nice makeup looks for brides. Let us be honest here. A lot of the gurus had never done any makeup on brides before. I have no problems with that because I started off not knowing how to put on proper makeup for brides too. However, issues starts when some of my clients asked me why couldn't I finish their bridal face makeup in 20 minutes, while youtubers could do it within 10 minutes.

1. Videos are being cut short. I have done tutorials on youtube a few years back. For a 6-8 minute video, I could actually be spending 60 minutes on the actual makeup.

2. They cut out a lot more steps for bridal makeup. Either that they did not know of some steps, they just didn't feel like doing them, or they don't want to share it. Whatever it is, cutting steps out could still achieve the same look on camera for a while. But that may not make your makeup last. Cutting steps may not enhance certain areas on the face, and the truth is that most of us don't have that kind of smooth skin you see on youtube. Or contours some pretty girls have on there. JEALOUS!

Look around youtube for bridal makeup inspirations. But don't just follow the steps - it doesn't work that way for everyone.

I'll stop at those 2 reasons and continue on the 20 minutes thing...

Yes it is possible to finish a face makeup in 20 minutes. But like I said in the previous post, wedding is once in a life time. Do try to put a little more time into it.

The average time a makeup artist spends on a bride's makeup & hair is around 1.5 hours. That is the average time Singapore makeup artist spend, and also the average time a bride is willing to spend on it. (Especially Chinese weddings... Chinese brides sometimes have to wake up at 4am due to their tradition! I ever start packing at 2am because of that... No sleep at all x.x )

The truth is.. A celebrity makeup artist could easily spend 3 - 4 hours on a makeup look, and that is normal for them. There is a difference between 30 minutes and a 3 hr makeup. Huge difference.

Now if brides got to get ready before 6am, it is obviously not possible for 3-4 hrs makeup! So what I do is I spend an average of 2 - 4 hours on my brides during their trial. Fellow makeup artists who come across this might think I am crazy and spoiling market whatever. But it is important to invest time for a long trial. A trial is not just about doing 1 makeup look. It is about learning the your contours and being able to shorten the makeup time on actual day. A trial also helps both parties to know about each other's style. Sometimes I get inspired to try new application methods so why not. Trial is good. Most importantly, it is only during trial that you could request for 2 - 3 different looks. (Some makeup artist might charge you more for more looks but it is worth it. Since trial are usually a lot cheaper than actual day makeup.)

ok think I got my point across.
And I do enjoy watching pixiwoo and lisaeldridge especially when it comes to serious makeup. They're good.

Xoxo